Collator Setup
A collator is a node that collates transactions on the parachain network into blocks and sends them to the relay chain for validation. Finality is achieved when the parablock is validated and its Proof of Validity is finalized on the relay chain.
Because transaction validity checks happen on the relay chain, collator security assumptions are minimal. A parachain can function with a single honest collator to avoid censorship.
Network Topology
A large decentralized parachain network typically consists of:
- Collators: Produce blocks.
- Bootnodes: Dedicated nodes for network discovery.
- RPC Nodes: Handle external API requests (separate from collators).
Production Advice
For testing, a single node can act as both collator and RPC. In production, separate these roles. Use distinct machines with proper load balancing and security.
Connecting to your Node
- Insecure WebSocket: If connecting via IP, use the Substrate frontend template.
- Secure WebSocket (WSS): Required for Polkadot JS UI on remote machines. This needs SSL setup.
- Localhost: Both UIs work seamlessly.
The Collator Selection Pallet
Educhain uses the collator-selection pallet. Key terms:
- Candidates: Accounts that register to become collators (usually by bonding tokens). This is permissionless.
- Invulnerables: Accounts guaranteed to participate in block production (e.g., bootnodes). They are added/removed via governance (sudo/root).
Chain Spec Tip
Add at least one Invulnerable collator in your chain_spec that you can start easily. This guarantees block production from genesis.
Node Roles & Resources
EduChain runs a single node with multiple roles (RPC + Collator) for simplicity. For robustness, split these:
- RPC Node: Handles user queries.
- Collator Node: Produces blocks.
Refer to the Parity DevOps Guide for details.
Setting up Collators in Chain Spec
If using the parachain template, configure a patch file to set:
- Initial public session key(s).
- Collator public keys (identity and reward destination).
Example configuration for two initial collators:
// Collator accounts that produce blocks and earn rewards.
"collatorSelection": {
    "candidacyBond": 16000000000,
    "invulnerables": [
        "5DLxwPqG2EsY93P6ii3LY1nsT59kSccZK7LJN7Vsv6DGt6Tg",
        "5DAPBz3PHJnVDFmLs67TL91NxCWZ6yyUBddgBGQgFYYxpGBi"
    ]
},

// Note: The private key of these session keys needs to be inserted into the collator node.
"session": {
    "keys": [
        [
            "5DLxwPqG2EsY93P6ii3LY1nsT59kSccZK7LJN7Vsv6DGt6Tg",
            "5DLxwPqG2EsY93P6ii3LY1nsT59kSccZK7LJN7Vsv6DGt6Tg",
            {
                "aura": "5Ck7qhcDuEScRc4Sg1MXYkA8HW8cx8EdaxoW7cva5sGrTWQZ"
            }
        ],
        [
            "5DAPBz3PHJnVDFmLs67TL91NxCWZ6yyUBddgBGQgFYYxpGBi",
            "5DAPBz3PHJnVDFmLs67TL91NxCWZ6yyUBddgBGQgFYYxpGBi",
            {
                "aura": "5CkZxLvH2UjBtWLoddGaavPVAv88o1Cww1aWa8UPz9Sw4iyv"
            }
        ]
    ]
}
You may notice that the collator and aura/session keys are different. For security reasons, the collator key should be stored in a secure location, i.e., a hardware wallet. The session key can change, and is effectively linked to the invulnerable key.
You can then use this patch file with chain-spec-builder and the Wasm runtime to generate the chain specification, as shown here.
For an explanation on the types of keys, their specific types, and how to generate them, refer to the Parity DevOps documentation.
Configuring and running your collator
To run a collator, one needs to make sure that:
- The node is synced with the relay chain (a local copy is needed, pruning is highly recommended)
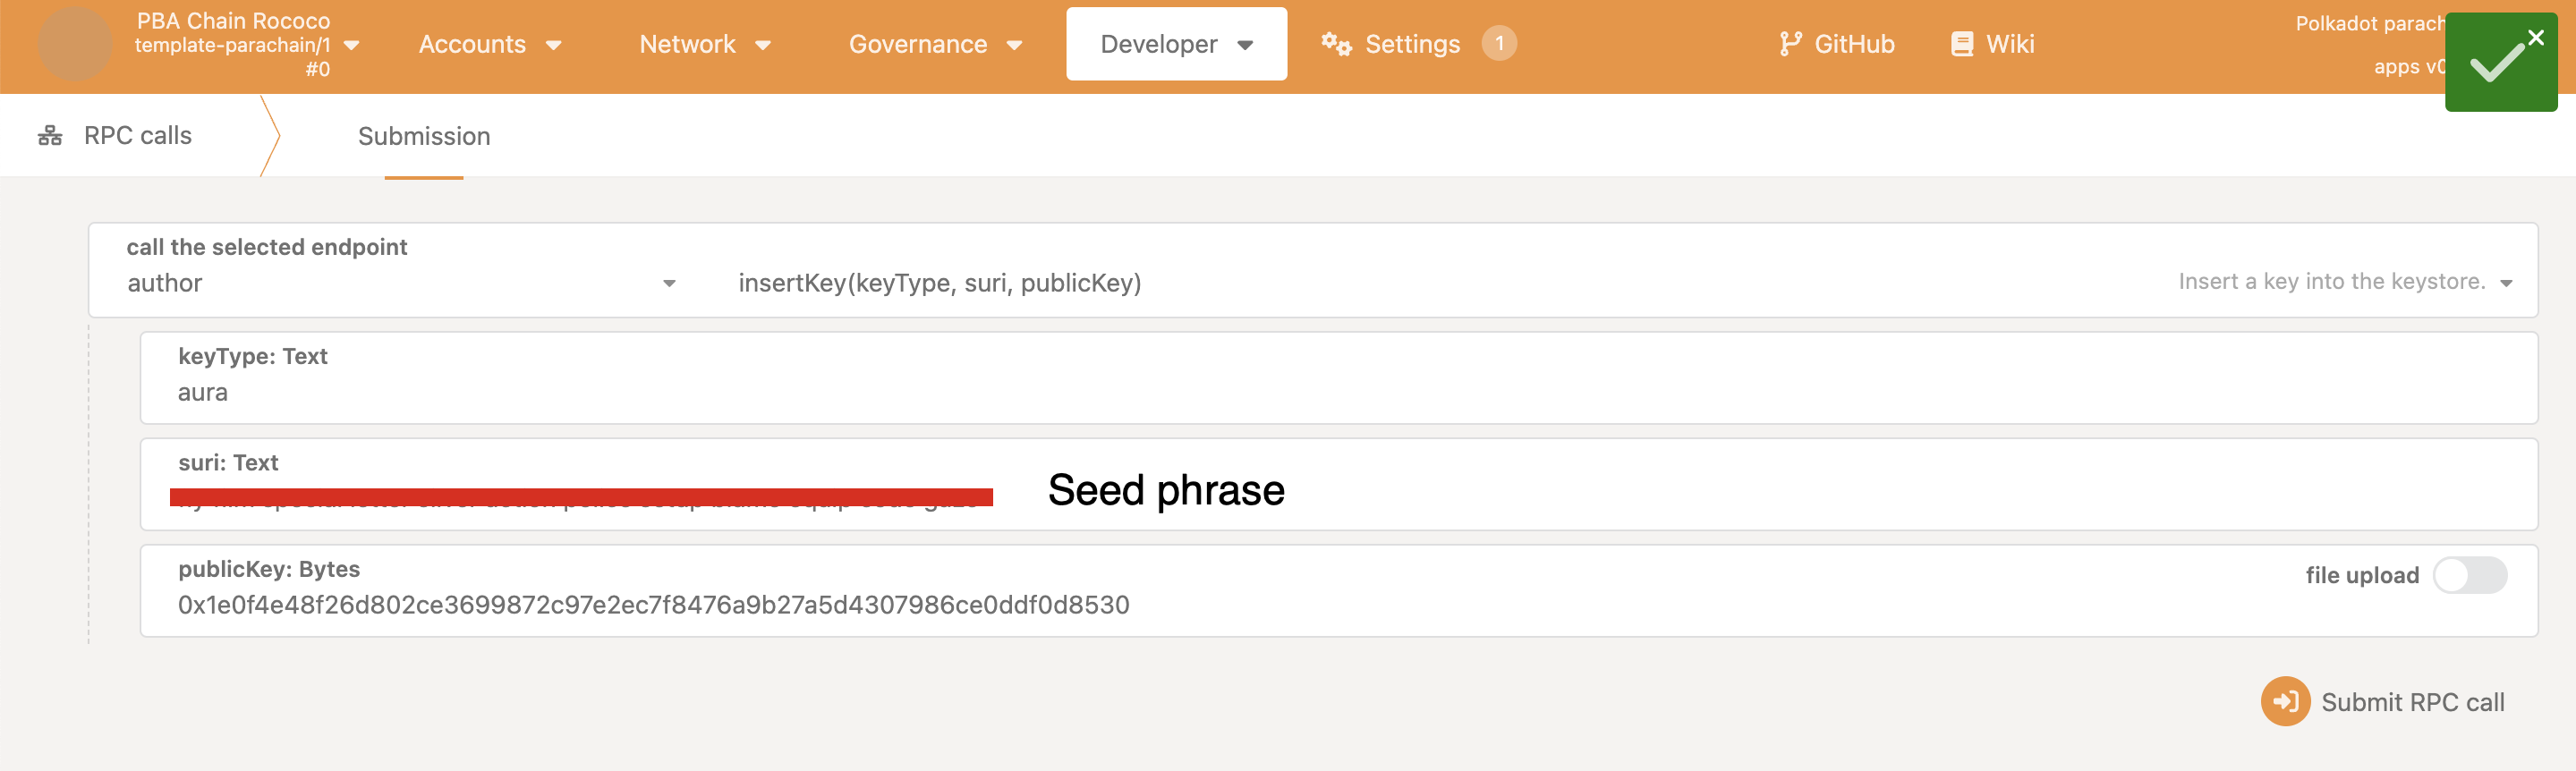
- The corresponding private key of the session key (for aura) in the chain spec is inserted, either through rpc or through the
polkadot-omni-nodekey insertcommand - To receive collator rewards, the session key and invulnerable address need to be linked. Otherwise, it will default to the first invulnerable in the configuration
Note: that it is recommended to insert the keys locally in your node, as RPC methods should not be exposed for external calls. In order for the below to work,
--rpc-methodsmust be set tounsafe, or not set at all.
Alternatively, with polkadot-omni-node, as seen in the Parity DevOps handbook.
Running the collator
Once your session keys are properly inserted, you can run your collator.
This sample command runs a collator using the polkadot-omni-node binary:
polkadot-omni-node --name COLLATOR_NAME \
--collator \
--chain plain-parachain-chainspec.json \
--base-path ./educhain \
--rpc-cors=all \
--rpc-methods=safe \
--port 30333 \
--rpc-port 8844 \
-- \
--chain paseo \
--sync warp \
--blocks-pruning 256
--state-pruning 256
Note that a few of the arguments, such as
--name,--chain,--base-pathshould be substituted with your own collator name, chain spec, and base path accordingly.
Once your collator has synced with its respective relay-chain, and as long as you have coretime (either bulk or on-demand are suitable) then your collator should be capable of blocks.
For a bootnode, it may help to generate a static network key, see this guide for more details.
Changing / rotating session keys
Because the genesis already sets the keys for the invulnerable and session keys, we do not need to call session.setKeys explicitly. As long as the correct session keys in the genesis are inserted for the collator, then it will use that account for rewards and block production.
However, if wish rotate keys, then we need to ensure that the mapping is properly updated:
- Calling
author.rotateKeys()and copying the public key - Setting the new key via ``
systemd and Collators
Once you've achieved a stable setup, you can look into automating the launch of your collator upon startup. Here is an example of a service which automatically starts a shell script using systemd on Ubuntu Linux:
start.node.sh:
polkadot-omni-node --name C2_EDU \
    --collator \
    --chain latest_plain_chain_spec-raw.json \
    --rpc-cors=all \
    --base-path ./educhain-paseo \
    --port 30333 \
    --rpc-methods=safe \
    --rpc-port 8844 \
    -ltxpool=trace \
    --pool-type fork-aware \
    --authoring slot-based \
    -- \
    --chain paseo \
    --sync fast \
    --blocks-pruning 256 \
    --state-pruning 256
Note that
--rpc-methods=safedisables certain RPC calls from the outside world. If you wish to call these unsafe calls externally, you may remove--rpc-methods=safe. It is prudent that for production environments, you ensure that no one can access these crucial calls (i.e., setting the keys in your node).
collator.service:
This way, now we can manage our elegantly collator with systemctl:
systemctl restart collator- Restarts the collatorsystemctl stop collator- Stops the collatorsystemctl start collator- Starts the collatorsystemctl status collator- Retrieves and displays the status of the collator
Here is an example of how a functioning collator looks in action, via the status command:
root@ubuntu-s-2vcpu-4gb-amd-nyc3-01:~# systemctl status collator
● collator.service - Collator for EduChain
     Loaded: loaded (/usr/lib/systemd/system/collator.service; disabled; preset: enabled)
     Active: active (running) since Wed 2024-06-05 18:02:23 UTC; 5 days ago
   Main PID: 132465 (sh)
      Tasks: 46 (limit: 4658)
     Memory: 2.1G (peak: 2.5G)
        CPU: 8h 23min 34.532s
     CGroup: /system.slice/collator.service
             ├─132465 /bin/sh start.node.sh
             └─132466 polkadot-omni-node --name C2_EDU --collator --chain plain-parachain-chainspec.json --base-path ./educhain --rpc-cors=all>

Jun 10 20:48:00 ubuntu-s-2vcpu-4gb-amd-nyc3-01 sh[132466]: 2024-06-10 20:48:00 [Relaychain] ♻️  Reorg on #10834776,0xf566…ab31 to #10834776,0x1>
Jun 10 20:48:00 ubuntu-s-2vcpu-4gb-amd-nyc3-01 sh[132466]: 2024-06-10 20:48:00 [Relaychain] ✨ Imported #10834776 (0x1583…c83f)
Jun 10 20:48:05 ubuntu-s-2vcpu-4gb-amd-nyc3-01 sh[132466]: 2024-06-10 20:48:05 [Parachain] 💤 Idle (0 peers), best: #153 (0x998c…e0d8), finali>
Jun 10 20:48:05 ubuntu-s-2vcpu-4gb-amd-nyc3-01 sh[132466]: 2024-06-10 20:48:05 [Relaychain] 💤 Idle (15 peers), best: #10834776 (0x1583…c83f),>
Jun 10 20:48:06 ubuntu-s-2vcpu-4gb-amd-nyc3-01 sh[132466]: 2024-06-10 20:48:06 [Relaychain] ✨ Imported #10834777 (0x705d…63cb)
Jun 10 20:48:10 ubuntu-s-2vcpu-4gb-amd-nyc3-01 sh[132466]: 2024-06-10 20:48:10 [Parachain] 💤 Idle (0 peers), best: #153 (0x998c…e0d8), finali>
Jun 10 20:48:10 ubuntu-s-2vcpu-4gb-amd-nyc3-01 sh[132466]: 2024-06-10 20:48:10 [Relaychain] 💤 Idle (15 peers), best: #10834777 (0x705d…63cb),>
Jun 10 20:48:12 ubuntu-s-2vcpu-4gb-amd-nyc3-01 sh[132466]: 2024-06-10 20:48:12 [Relaychain] ✨ Imported #10834778 (0x7a52…93f6)
Jun 10 20:48:15 ubuntu-s-2vcpu-4gb-amd-nyc3-01 sh[132466]: 2024-06-10 20:48:15 [Parachain] 💤 Idle (0 peers), best: #153 (0x998c…e0d8), finali>
Jun 10 20:48:15 ubuntu-s-2vcpu-4gb-amd-nyc3-01 sh[132466]: 2024-06-10 20:48:15 [Relaychain] 💤 Idle (15 peers), best: #10834778 (0x7a52…93f6),>
Setting up SSL and nginx proxy
This doesn't aim to be an exhaustive devops guide on nginx (for that, you can refer here). You should have the following already obtained:
- A domain
nginxinstalled- A free SSL certificate via Lets Encrypt via
certbot
Once that is in place, navigate to your site's nginx config, and go to the server block with Certbot's SSL settings, and paste the following:
location / {
    proxy_buffers 16 4k;
    proxy_buffer_size 2k;
    proxy_pass http://localhost:8844;
    proxy_http_version 1.1;
    proxy_set_header Upgrade $http_upgrade;
    proxy_set_header Connection "Upgrade";
    proxy_set_header Host $host;
}
Please note that the URL "http://localhost:8844"'s port must match your running collator.
server {
        server_name rpc.web3educhain.xyz www.rpc.web3educhain.xyz;
        location / {
            proxy_buffers 16 4k;
            proxy_buffer_size 2k;
            proxy_pass http://localhost:8844;
            proxy_http_version 1.1;
            proxy_set_header Upgrade $http_upgrade;
            proxy_set_header Connection "Upgrade";
            proxy_set_header Host $host;
        }
    listen 443 ssl; # managed by Certbot
    # other SSL info here...
}
Once this is in place, restart nginx, and you can access the node via port 443.